SURE-STOP® PVC WATERSTOP
STANDARD PERFORMANCE SPECIFICATION (SPS) GRADE
Click on Images to view full screen
PRODUCT BROCHURES
Standard Profiles
International Profiles
Typical Installations
Welding Equipment

Product Description
CORKJOINT® Sure-Stop® PVC Waterstops lead the way in high technology and design, and comply to international standards.
Sure-Stop® PVC Waterstops are extruded from specially compounded PVC in accordance with BS2571 and tested following BS2782 and ASTM test methods of testing plastics, and are designed for for use in water retaining and water excluding structures where a positive seal is required for poured in-situ concrete expansion, construction and contraction joints.
Sure-Stop® PVC Waterstops are designed for use in many types of applications and structures, and are available in a number of different size profiles to suit a project’s requirement.
Sure-Stop® PVC Waterstops are available in rolls with separate intersections supplied to simplify and minimise on-site fabrication. The waterstop is heat weldable and allows for fast and easy on-site welding/joining.
The efficiency of any waterstop is very dependent on good workmanship, installation, and on full compaction of the surrounding concrete around the waterstop during concrete placement. Optimum performance will be achieved if the waterstop is installed by keeping these important factors in mind.
Advantages
- A full range of profiles and sizes to suit all types of construction requirements
- Sure-Stop® PVC Waterstops conform to, and exceed all major international standards
- High quality compounded PVC for long term durability and integrity
- Factory made intersections to simplify and minimise on-site fabrication
- On-site welding equipment is available upon request
- Internal profiles come with factory pre-punched eyelets for easy and secure wire tying to
reinforcement - Ability to withstand high hydrostatic head pressures
Areas of Application
Water retaining structures:
- Water tanks
- Water treatment plants
- Sewage treatment plants
- Swimming pools
- Dams and spillways
- Reservoirs
- Bund walls
Water excluding structures:
- Basements
- Underground car parks
- Tunnels
- Retaining walls
- Suspended slabs
- Below ground slabs
- Roof & podium slabs
Note : The product’s design and performance, its intended use, installation and final confirmation and approval for use, must be provided by the project’s Design Engineer and Project Manager.
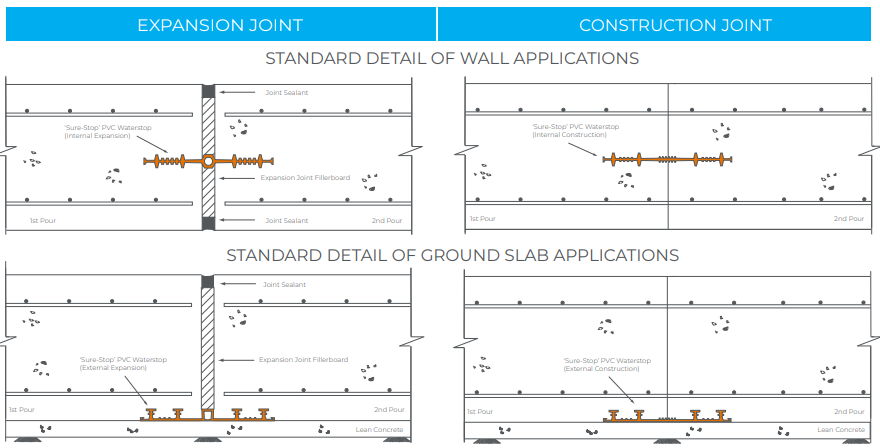
Typical Applications
Technical Features
Refer to the product brochure for diagrams of Expansion Joint and Construction Joint applications.
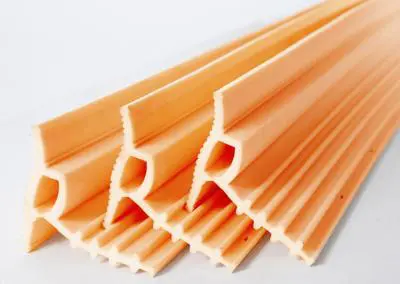
COLOUR – Orange
PACKAGING – 150mm – 200mm = 20m roll, 250mm = 15m roll,
320mm = 12m roll
ROLL WEIGHT – Dependent upon profile type
STORAGE CONDITIONS & SHELF LIFE – 5 years from the date of production if stored properly in original, unopened and undamaged sealed packaging, in dry conditions out of direct sunlight at temperatures between +10°C and +40°C
MATERIAL TYPE – Polyvinyl Chloride (PVC)
WELDING TEMPERATURES – Approximately 190°C – 200°C
SERVICE TEMPERATURE RANGE – -25°C to +70°C
Physical Properties
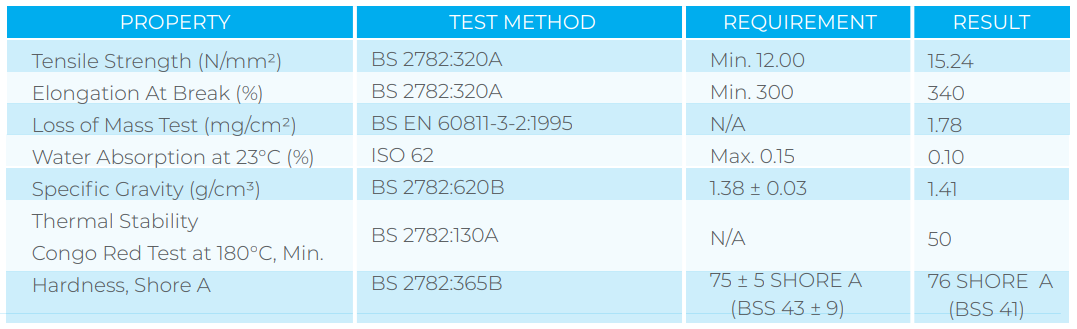
Refer to CORKJOINT®’s in house Certificate of Analysis (COA) dated 31/12/2022 for test results pertaining to the above. A COA is conducted on every batch of raw material that is used in the production of Sure- top® PVC waterstops. Independent laboratory test results are also available upon request. Project specific material properties can be custom compounded to suit. Material properties can vary between batches.
Profile Drawings
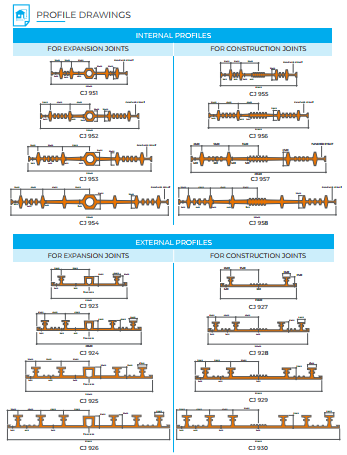
NOTE: Full dimension drawings available upon request.
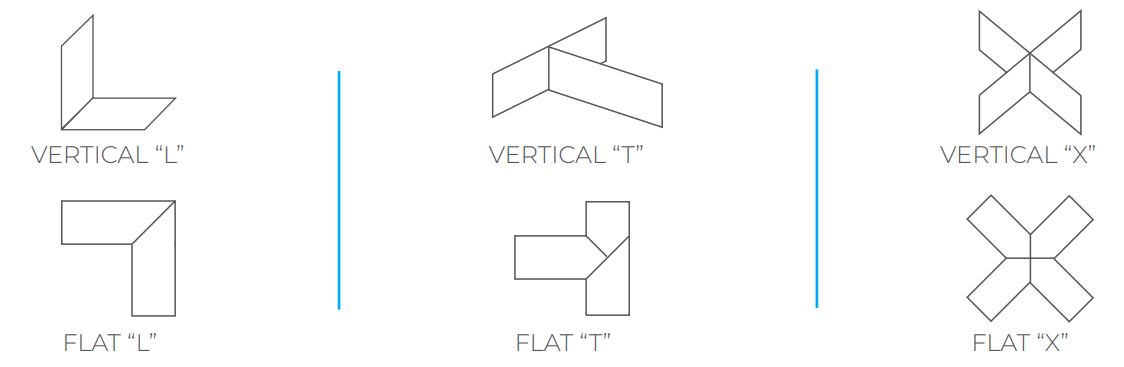
Factory Made Intersections
A wide range of standardised prefabricated intersection pieces are available allowing easy site welding of butt joints to Sure-Stop® PVC Waterstop junction pieces. Customised pieces can be made to suit. In such cases, drawings must be provided giving exact dimensions and jointing details.
Site Joining & Welding Equipment
CORKJOINT® recommends the use of its specialised welding equipment for on-site welding which consists of thermostatically-controlled Welding Irons and special Welding Jigs (each type of CORKJOINT® Sure-Stop® PVC Waterstop requires its own welding jig to suit the particular shape). On-site joining is a simple exercise using CORKJOINT® Heat Welding Equipment comprising of an adjustable Welding Jig and Welding Iron. The ends of the waterstop are cut square and placed into the adjustable Welding Jig, then push the ends of the waterstop against the Welding Iron and bring the two ends together until the molten ends of the PVC fuse. When ordering Welding Equipment, please advise profile number of the waterstop required.
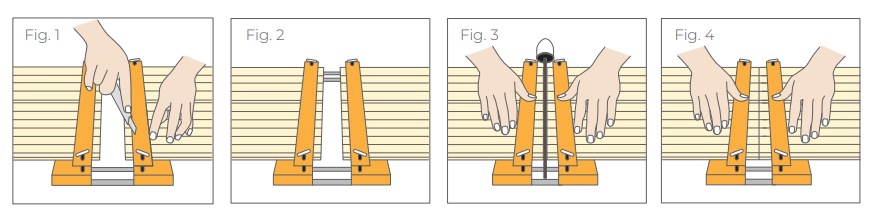
SURE-STOP® PVC WATERSTOP SITE JOINING GUIDELINES
Following is the recommended procedure for site joining Sure-Stop® PVC Waterstop. On-site welding is a relatively simple exercise using CORKJOINT® Heat Welding Equipment comprising of Welding Jig and Welding Iron. Refer to CORKJOINT® Sure-Stop® PVC Waterstop Welding Equipment brochure.
- The number of joins in Sure-Stop® PVC Waterstop shall be the minimum practical. Straight splices can be carried out in the field but all intersections shall be factory produced and supplied by CORKJOINT®.
- Preheat Welding Iron until the desired welding temperature is achieved, which is approximately 190ºC-200ºC.
- Place the ends of the Sure-Stop® PVC Waterstop through the adjustable Welding Jig and clamp down using the assembly screws, cut both ends off square with a sharp knife or fine tooth saw. (Refer Fig. 1).
- Loosen the clamps and slide back Sure-Stop® PVC Waterstop allowing approximately 10-15mm of waterstop to protrude from both ends, then clamp the Welding Jig down tightly in position with the screws. At this stage when the Welding Jig slides together, the ends should meet squarely, and the profiles are to match up. If the Sure-Stop® PVC Waterstop is not square to each other, or the profiles do not meet up, loosen the clamps on the Welding Jig and adjust the waterstop until the ends meet up perfectly, then tighten up the clamps ready for welding. (Refer Fig. 2)
- Slide the two halves of the Welding Jig apart and position the pre-heated Welding Iron on top of the bars between the Sure-Stop® PVC Waterstop ends. Slide the two waterstop end sections back together until they press against the sides of the Welding Iron and maintain the pressure in this position until a bead of molten PVC, approximately 4mm-5mm thick, appears along the length of the Welding Iron. The PVC must melt without charring or burning. (Refer Fig. 3)
- Slide the Welding Jig apart, remove the Welding Iron vertically and then slide the two halves of the profile back together holding under pressure for approximately 45 seconds to 60 seconds, allowing the molten PVC to fuse together. (Refer Fig. 4)
- Unclamp the Welding Jigs and carefully remove the joined Sure-Stop® PVC Waterstop taking care not to flex the join until it is cool (approximately 5 minutes).
Note: Welding should only be carried out in areas with adequate ventilation, if welding in confined locations, it is considered necessary to provide forced ventilation or a suitable respirator. Care must be taken not to heat the PVC to the point of charring as harmful fumes may be released. Safety Data Sheet (SDS) available upon request.
The information and the recommendations relating to the application and end use of this product are given in good faith and are based on the information provided by the manufacturer of the product and/or the Company’s current knowledge and experience in connection with the product when properly stored, handled and applied under normal conditions and no liability of final function at the job site is assumed. In practice, the differences in materials substrates and actual site conditions are such that no warranty in respect of merchantability of or fitness for particular purpose, nor any liability arising out of any legal relationship whatsoever, can be inferred either from this information, or from any written and/or oral recommendations, or from any other advise offered by the Company. The Company also has no express or implied knowledge of any particular purpose for which the product is required and any such information given will not be taken into account in the supply of this product. No responsibility or liability by the Company will be accepted for misuse, misreading or derivation from recommended guidelines in respect of this product and the user shall determine the suitability of the product for his intended use and assume all risks and liability in connection therewith. The information contained in these documents may change at any time without notice. Any use of this product in any application should be approved as suitable for use/application by the Design Engineer and Project Manager.
Profile Width Guidelines
The width of waterstop depends upon the thickness of the concrete and positioning of the reinforcement. The thickness of the concrete should be greater than or equal to the width of the waterstop profile. Refer to your engineer for further clarification and approval.
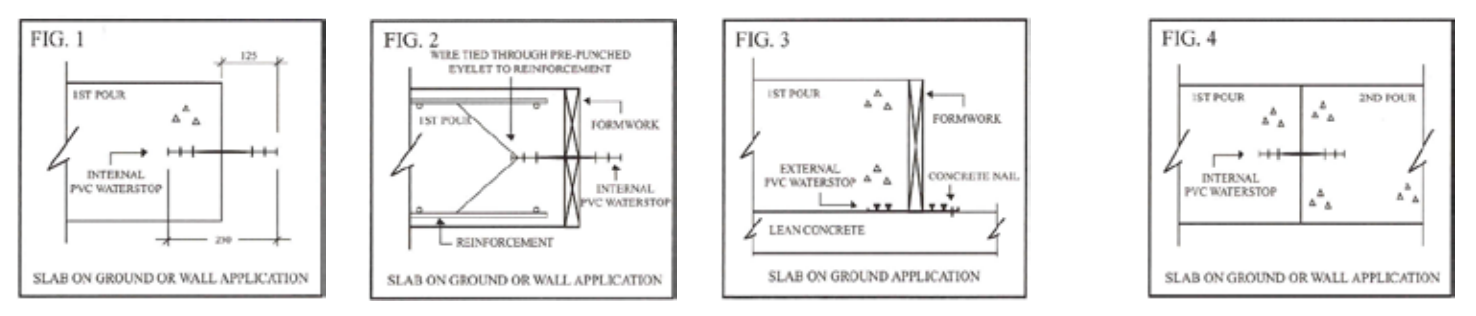
Typical Installations
INTERNAL & EXTERNAL STYLE SURE-STOP® PVC WATERSTOPS
- Prior to placement, all Sure-Stop® PVC Waterstop joins and intersections must be welded together on site using our recommended welding and joining procedure (refer to our “CORKJOINT® Sure-Stop® PVC Waterstop Site Joining Guidelines” brochure).
- Sure-Stop® PVC Waterstop should be positioned inside the joint so that one half of the waterstop width is embedded into each concrete pour. (Refer FIG. 1).
- INTERNAL Sure-Stop® PVC Waterstops must be securely tied into position through the pre-punched brass eyelets located on the external outer flanges of the waterstop. These are positioned every 300mm apart along both outer edges of the waterstop, giving a very secure fixing position. In vertical joint applications, the placement of form work is then positioned below and on top of the waterstop by butting up to it from both sides, achieving a split formwork outcome, which also helps secure/hold the waterstop into position. (Refer FIG. 2 ) Usually in horizontal joint applications no formwork is required.
- EXTERNAL Sure-Stop® PVC Waterstop are secured into position by concrete nails that are hammered through the specially designed outer flange areas of the waterstop, into the lean concrete base (blinding layer) for slab on ground applications or by nails or screws into the formwork, for wall applications. In vertical joint applications the placement of formwork is then positioned on top of the waterstop by butting up to it. This also helps secure/hold the waterstop into position. (Refer FIG. 3)
- To achieve the ultimate installation procedure, carefully place the concrete so as not to displace Sure-Stop® PVC Waterstop from its position. Thoroughly vibrate concrete around the waterstop to avoid air entrapment and to provide a positive contact between the waterstop and the concrete. Particular care should be taken when installing internal waterstops for slab on ground applications to make sure concrete is fully vibrated and compacted around and underneath the waterstop and all its ribs. (Refer FIG. 4).
- Please also refer to our “CORKJOINT® Sure-Stop® PVC Waterstop Site Joining Guidelines” for further information on Sure-Stop® PVC Waterstop welding / joining procedures and preparation and installation procedures.
Test Reports & Certifications
- Physical Material Properties – Independent laboratory tested
- Certificate of Analysis – In-House tested and available for each customer order
- Hydrostatic Head Burst Pressure Resistance – Independent laboratory tested
- Hydrostatic Head Pressure Resistance – In-house tested on specific profile types.
- Best Environmental Practice (BEP) PVC Certified
Note : The above test reports and certifications are available upon request.
Written Specification
Where shown on the drawings waterstops shall be Sure-Stop® PVC Waterstop (state profile number required) as supplied by CORKJOINT®. Provide factory made waterstop fabrications for all changes of direction, intersections and transitions, leaving only straight butt joined splices for on-site fabrication.
Health and Safety Information
Joining of PVC Waterstops is performed by heat welding which results in the discharge of hydrogen chloride mist and vapour. In confined spaces or in still air conditions, the use of a ventilation fan or suitable respirator should be used, and the advice and approval of the Site Safety Supervisor is essential. For further information or advice on health and safety precautions, safe handling, storage and correct disposal of products, please refer to the most recent product Safety Data Sheet (SDS), which is available upon request.
Product Brochure Validity
CORKJOINT® undertakes modifications to its product brochures on a continual basis, as and when required.
Please check under the product summary section at www.corkjoint.com to ensure that you have the latest version of our product brochures.
Disclaimer
The information and the recommendations relating to the application and end use of this product are given in good faith and are based on the information provided by the manufacturer of the product and/or the Company’s current knowledge and experience in connection with the product when properly stored, handled and applied under normal conditions and no liability of final function at the job site is assumed. In practice, the differences in materials, substrates and actual site conditions are such that no warranty in respect of merchantability of, or fitness for, particular purpose, nor any liability arising out of any legal relationship whatsoever, can be inferred either from this information, or from any written and/or oral recommendations, or from any other advice offered by the Company. The Company also has no express or implied knowledge of any particular purpose for which the product is required and any such information given will not be taken into account in the supply of this product. No responsibility or liability by the Company will be accepted for misuse, misreading or derivation from recommended guidelines in respect of this product and the user shall determine the suitability of the product for his intended use and assume all risks and liability in connection therewith. The information contained in our brochure may change at any time without notice. Any use of this product, Sure-Stop® PVC Waterstop, in any application should be approved as suitable for use/application by the Design Engineer and Project Manager.


